

Create a simple 2D sprite-based game (or at least the beginnings of a game), using textures with alpha.
You can use the sprites in sprites.zip, or create your own.
There should be one character that is controlled by the user, plus other characters or objects, and a background.
The character sprite should be animated when it moves; this will involve cycling through different textures.
|
|
|
|
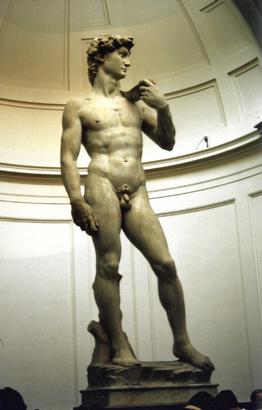
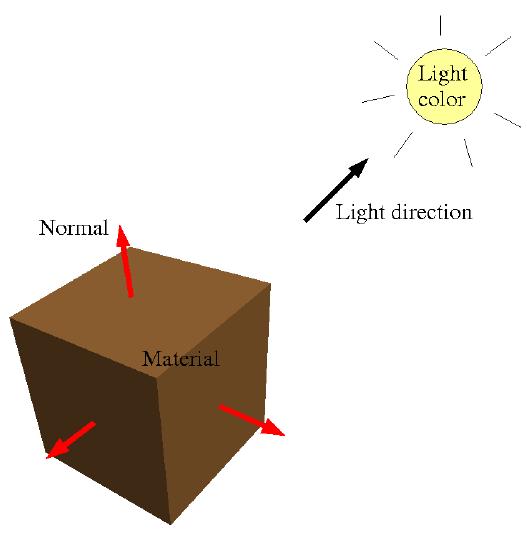
Lighting provides very significant cues to the 3 dimensional shape of objects.
Lighting in computer graphics attempts to simulate the behavior of light
in the real world.
Real-time lighting involves significant simplifications.
To make OpenGL use lighting calculations when drawing objects, enable GL_LIGHTING:
glEnable(GL_LIGHTING)
You must also turn on at least one light source:
glEnable(GL_LIGHT0)
Example: glutGeometry-lit.py
| 
|
OpenGL lighting involves three components:
Light source attributes are set by glLight.
A light source has a position and a color.
The intensity of the light is simply the intensity of the color.
    glEnable(GL_LIGHT0)
    glLightfv(GL_LIGHT0, GL_POSITION, [0, 1, 0, 0])
    glLightfv(GL_LIGHT0, GL_DIFFUSE, [1, 1, 1, 1])
Lights can be infinite (a.k.a. directional) or local
All rays from an infinite light source come in the same direction.
Rays from a local light source come from a particular point in space.
The 4th value in the light source's position controls this feature:
0 = infinite light
1 = local light
# Light comes from above
    glLightfv(GL_LIGHT0, GL_POSITION, [0, 1, 0, 0])

# Light comes from point (0,1,0)
    glLightfv(GL_LIGHT1, GL_POSITION, [0, 1, 0, 1])
Example: lightpos.py
A light source's position is affected by the current transformation.
Lights should be defined after the camera transformation, in order to define them in "world" coordinates.
They can also be moved with transformations, just like an object.
# Make local light come from position (5, 0, 7)
    glPushMatrix()
    glTranslatef(5, 0, 7)
    glLightfv(GL_LIGHT0, GL_POSITION, [0, 0, 0, 1])
    glPopMatrix()
Example: light-xform.py
You can enable multiple simultaneous lights.
The lights are named GL_LIGHT0, GL_LIGHT1, ...
At least 8 light sources are allowed - more may be available.
    glEnable(GL_LIGHT1)
    glLightfv(GL_LIGHT1, GL_POSITION, [-1, 1, 2, 0])
More lights = more computations, and potentially slower rendering
Example: 3point.py
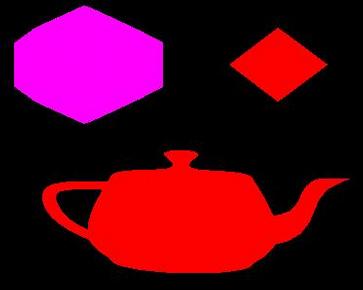
Material properties define how a surface reflects light.
Basically, they represent the surface color.
When lighting is active, glColor is ignored; the material is used instead.
Material properties are set using glMaterial.
    blue = [0.1, 0.4, 1, 1]
    glMaterialfv(GL_FRONT, GL_DIFFUSE, blue)
Example: material.py
Light sources can have a color & intensity.
The default is full white.
    blue = [0.1, 0.4, 1, 1]
    glLightfv(GL_LIGHT0, GL_DIFFUSE, blue)
The color of a light defines how much red, green, and blue light is shining
on an object.
The color of a material defines how much red, green, and blue light it reflects.
The final color we see is the combination of the two - corresponding components are multiplied together.
Example: lightcolor.py
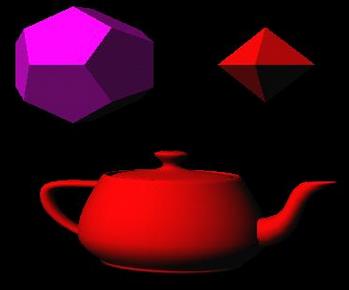
The basic lighting effect is diffuse lighting.
The intensity of diffuse lighting depends on the orientation
of the surface relative to the light source.
Diffuse light is reflected equally in all directions.
Specularity is light that is more-or-less directly
reflected off the surface to the camera.
Its intensity depends on the orientation of the surface relative to
camera, as well as to the light source.
Ambient light comes from no particular direction.
It reflects equally in all directions

Specularity produces shiny highlights on surfaces.
It involves 3 attributes: the specular color and the shininess of the material, and the specular color of the light source.
    glLightfv(GL_LIGHT0, GL_SPECULAR, [1, 1, 1, 1])

    glMaterialfv(GL_FRONT, GL_SPECULAR, [1, 1, 1, 1])
    glMaterialf(GL_FRONT, GL_SHININESS, 50)
A higher GL_SHININESS value produces smaller highlights.
To disable specularity, set the specular color to black ([0,0,0,0])
Example: specular.py
Ambient light simulates indirect lighting.
It is basically a constant level of lighting that's added to a surface's color, regardless of orientation.
The ambient lighting effect is the product of the light source's ambient color and the material's ambient color.
glLightfv(GL_LIGHT0, GL_AMBIENT, [0.1, 0.1, 0.1, 1])

glMaterialfv(GL_FRONT, GL_AMBIENT, [1, 1, 1, 1])
There is also a global source of ambient light, controlled by glLightModel
glLightModelfv(GL_LIGHT_MODEL_AMBIENT,[.1, .1, .1, 1])
Example: ambient.py
To calculate how much light reflects off of a surface, OpenGL needs to know which direction the surface is facing.
The surface orientation combined with the direction of the light determines the intensity of the diffuse component of lighting.
The surface orientation, light direction, and direction to the viewer determines the specular component.
The orientation of a surface is defined by a normal - a vector perpendicular to the surface.
A normal should be a unit vector - its length should be 1.
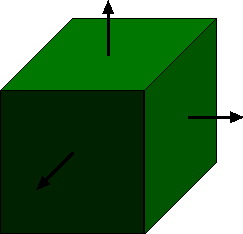
Normals in OpenGL are given with the glNormal function.
Lighting calculations use a normal at each vertex drawn;
you can provide a normal with each vertex, or fewer.
glBegin(GL_TRIANGLES)

glNormal3f(0, 1, 0)
glVertex3f(-1, 0, 0)

glNormal3f(0, 1, 0)
glVertex3f(1, 0, 0)

glNormal3f(0, 1, 0)
glVertex3f(0, 0, 2)

glEnd()
Examples: normal.py ring-normals.py cube.py
Often you will have 3D polygonal data for an object, but need to generate normal vectors for it, in order to light it.
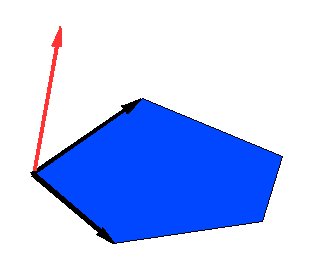
To compute normals from polygonal vertex data, use the cross product.
The cross product produces a new vector that is perpendicular to the two multiplied vectors. If the two vectors are edges of a polygon, then the cross product will give you a normal vector for the polygon (you will need to normalize its length to be 1.0, however).
Additional lighting features in OpenGL are:
